Overview
Forged is a manufacturing and device provisioning tool. It is designed to be a swiss army knife of the embedded manufacturing process.
Some notable features:
-
Forged.dev tracks and stores data associated with every device manufactured, including:
- User-provided parameters (such as serial numbers)
- Measured values (such as voltage measurements performed during testing)
- Queried values (such as chip UUIDs and MAC addresses programmed by chip manufacturers)
- Generated values (such as device-specific calibration coefficients generated from other parameters)
- Logs associated with the provisioning process
-
Forged.dev provides cloud-based storage and retrieval of released firmware images, which allows:
- Automated incorporation of firmware releases directly into manufacturing processes
- A single source for firmware delivery to any number of distributed machines
- Tracking of firmware statistics over time, such as flash utilization rates
- Tracking of all released firmware variants
- Associating specific firmware releases with specific devices
-
Forged.dev provides an adaptive GUI for the device provisioning process
- GUI adapters to the project parameters to automatically follow a provisioning process
-
Forged.dev supports formal requirements and manufacturing testing
- Data collected during the provisioning process is automatically checked against specified requirements to determine passing and failing units automatically.
Getting Started
You can get started with forged.dev quickly and easily be following a few basic steps:
1. Set up a project
The first step in getting started with forged.dev requires you to set up a project. Each project describes a single product that is being manufactured. Setting up a project is as simple as giving it a name and selecting what chip your project is targetting.
Note
Note that forged.dev (currently) primarily supports most ARM Cortex-M and RISC-V processors.
If your project is using another processor, forged.dev can still be used, but some features may have reduced functionality. For example, if you use a processor that is not listed, the below limitations apply:
- The provisioner UI cannot be used if you need to read or write device memory. In this case, you
will have to use the forged.dev API clients directly and implement your own methods of reading and
writing device memory.
- This applies to having a binary uploaded for the project, or for data blocks that need to be written to device memory.
2. (Optional) Specify device data
Once you have created your project, you will need to specify the data that will be associated with each device. Create any number of data blocks that your device has specified.
Some examples of data blocks include:
- Device serial numbers
- Manufacturing test measurements
- Supply voltage measurements
- Current usage measurements
- Device wireless identifiers (e.g. Bluetooth UUID, Ethernet MAC address)
3. (Optional) Specify device requirements
Once you have set up your required data blocks, create any requirements that a device must meet before passing the provisioning process. These requirements will be checked at the end of the provisioning process to verify that the device is operating within required specifications.
Some examples of requirements include:
- Limitations on the range of supply voltage measurements
- Maximum operating current limits
4. (Optional) Upload a binary
If your project has firmware that needs to be programmed onto the device, you can upload the firmware build directly to forged.dev to be programmed onto your device during the provisioning process. Upload your compiled firmware image to forged.dev with an associated version to add it to your project provisioning process.
5. Configure a provisioner
Now that the rest of the project is set up, you'll need to set up a provisioner responsible for executing the device provisioning process. The provisioner is a computer that communicates over the internet with forged.dev, and is responsible for:
- Programming firmware onto your device
- Conducting device measurements and executing manufacturing tests
- Collecting device-specific information, such as serial numbers
Forged.dev provides an out-of-the-box provisioner user interface for all major operating systems that enables you to quickly get a provisioner set up. You can install the provisioner utility from the "Releases" tab of the forged.dev website.
If your project has more complex requirements that the provided provisioner utility cannot support, you can create your own provisioner tools using the forged.dev API clients. Forged currently maintains API clients for the following languages:
RustPython
If you need an API client for a language not yet supported, please get in contact with forged.dev. It's also possible to develop custom clients to talk to the forged.dev website to drive the manufacturing provisioning process. Forged.dev uses a GraphQL API, so custom clients can be made for almost any language.
5. Provision a device
Once your provisioner is set up, you can provision your very first device. Connect your device to a supported programming probe and start the provisioning process. Your device will automatically appear in the forged.dev website under the "Devices" tab of your project.
Why Forged?
Forged was developed by embedded system engineers to solve issues faced during the development and manufacturing of hardware.
Some specific goals that forged is trying to solve:
- Easily and reliably deploy firmware to production, where the production house may be an external department or even out-of-house contract manufacturer continents away.
- Guarantee data discoverability, retention, and preservation
- Allow easy device-specific configuration management
- Enable non-technical individuals to easily use complex manufacturing processes without complex training
- Enable traceability within the manufacturing and provisioning process to well-defined requirements and data layouts.
- Enable manufacturers to easily validate device behaviors before shipping product to customers
Forged Projects
Projects are the heart of the forged.dev workflow. All activity happens within a forged.dev project.
Once your project is created, you can:
- Upload firmware releases
- Provision and track newly manufactured devices
- Set up provisioning hardware for the manufacturing process
- Specify data associated with devices
Forged.dev projects have a few fundamental building blocks that we'll go over here to explain how forged.dev works. A brief overview of the fundamentals is provided below. Please refer to the respective documentation page for further information on these concepts.
Devices
When you create a new project, the Devices tab records all of the devices that are manufactured
with this project. Each device tracks:
- Measurements associated with the device
- Device-specific data, such as serial numbers
- Logs from the manufacturing and provisioning process
- Attachments from the provisioning process
- Provisioning status (pass/fail results)
- Other device-specific information
Device Runs
A single device may be processed through the provisioning process multiple times. This can occur for a variety of reasons, such as equipment operating incorrectly during the provisioning process, or as a result of identified and corrected issues in the hardware being tested. Each of these passes through the provisioning process is tracked as a separate "run" for a single device.
There is no limit to the number of runs that can be associated with a device.
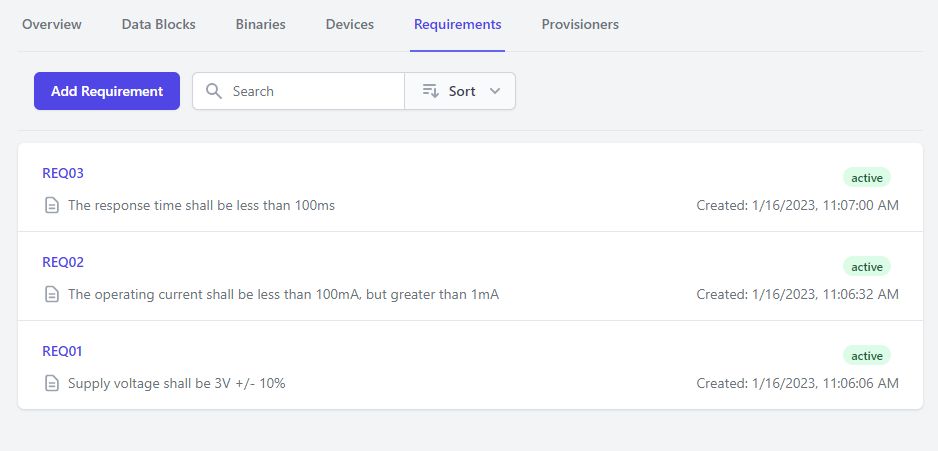
Requirements
Requirements are a method to verify that your device is operating to required specifications before determining if it is passing or failing the manufacturing process.
Forged uses requirements to automatically check measured data against pre-specified requirements at the end of the provisioning process. If all the required data is present and within specification, the device is considered to have passed provisioning. If data is absent, a step in the provisioning process fails, or if data is specified outside of required tolerances, the device run is marked as failing.
Data Blocks
Data blocks represent what data is associated with a device. Blocks specify the format and content of the data, as well as where the data originates from. The "Data Block" outlines the schematic for what data will be associated with your manufactured devices before the process completes.
Requirements are always tested against a specific data block.
Provisioners
Provisioners are the computer that actually performs the provisioning process. These computers have a programmer connected to them (often via a USB cable) that connects to the hardware that is being provisioned.
Forged provides two workflows for the provisioner:
- The provisioner can use the Provisioner UI to automate the provisioning process in a user-friendly manner
- API clients are provided for many languages to allow you to manually drive and customize the entire provisioning process.
Devices
A "Device" in forged.dev refers to a real, physical piece of hardware that has been built as part of your project.
A device has characteristics (such as supply voltages, current requirements, operating characteristics) that are associated with it, and these characteristics do not change without physical modification of the hardware or firmware.
Background
When a device is run through the provisioning process, generally, the following occurs:
- Data about the identity of the device is collected (such as the serial number)
- The device is programmed with the latest firmware
- The device identifiers are programmed into the device so that it knows its own identity
- The device electrical characteristics are tested against requirements
- The device is marked as passing or failing based on the results of the previous steps
Device Runs
Often times, a defect may be found in a device (or the test system) that is then corrected. The device is then run through the provisioning process a second time to see if the issue has resolved. Each execution of the provisioning process is called a "Run".
Device Views
When a device is run through the provisioning process, all of the data associated with it is collected and stored for presentation in the user interface.
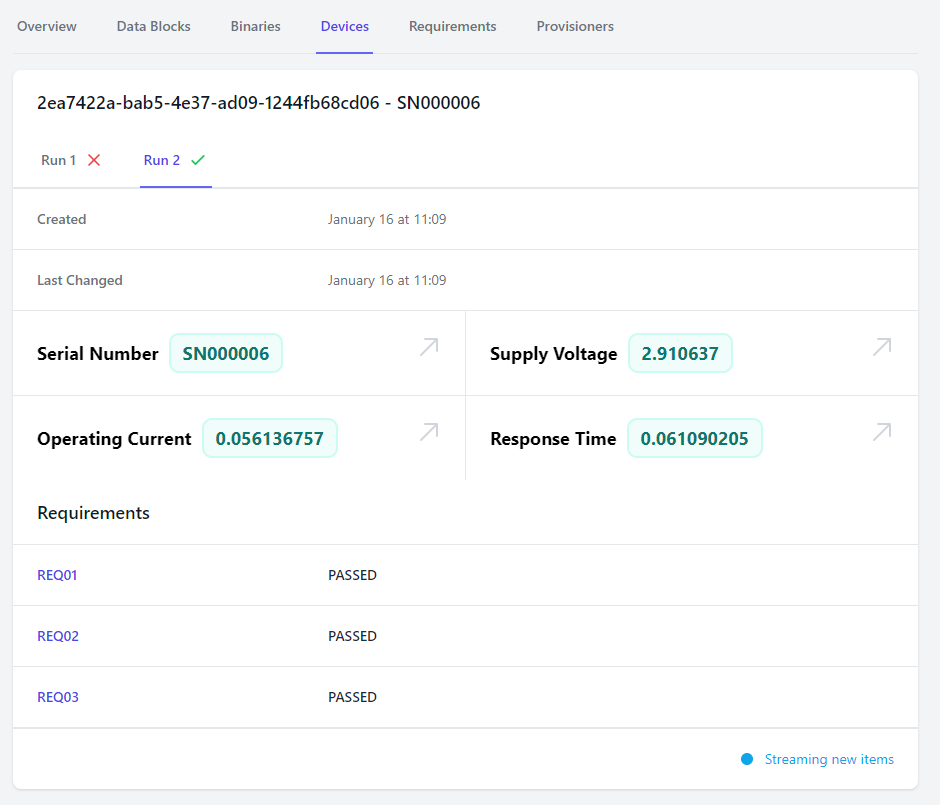
As you can see, each of the Data Blocks captured in the run are displayed in the user interface.
Additionally, all of the tested requirements are displayed. This information offers a comprehensive
report of the provisioning process for the device to give you confidence that your devices are
operating to specification.
Logs
Devices support displaying logs as part of the overview. Logs are generated by the provisioner during the provisioning process.
Attachments
Similar to logs, devices may have attached data files, such as images or test data. These attachments are associated with a run and can be viewed and downloaded directly from the forged.dev user interface.
Data Blocks
Data blocks describe what data is associated with your device. This encompasses input parameters, test measurements, configuration parameters, and automatically derived values.
Data can only be associated with a device once a block has been created that describes the data.
Creating Data Blocks
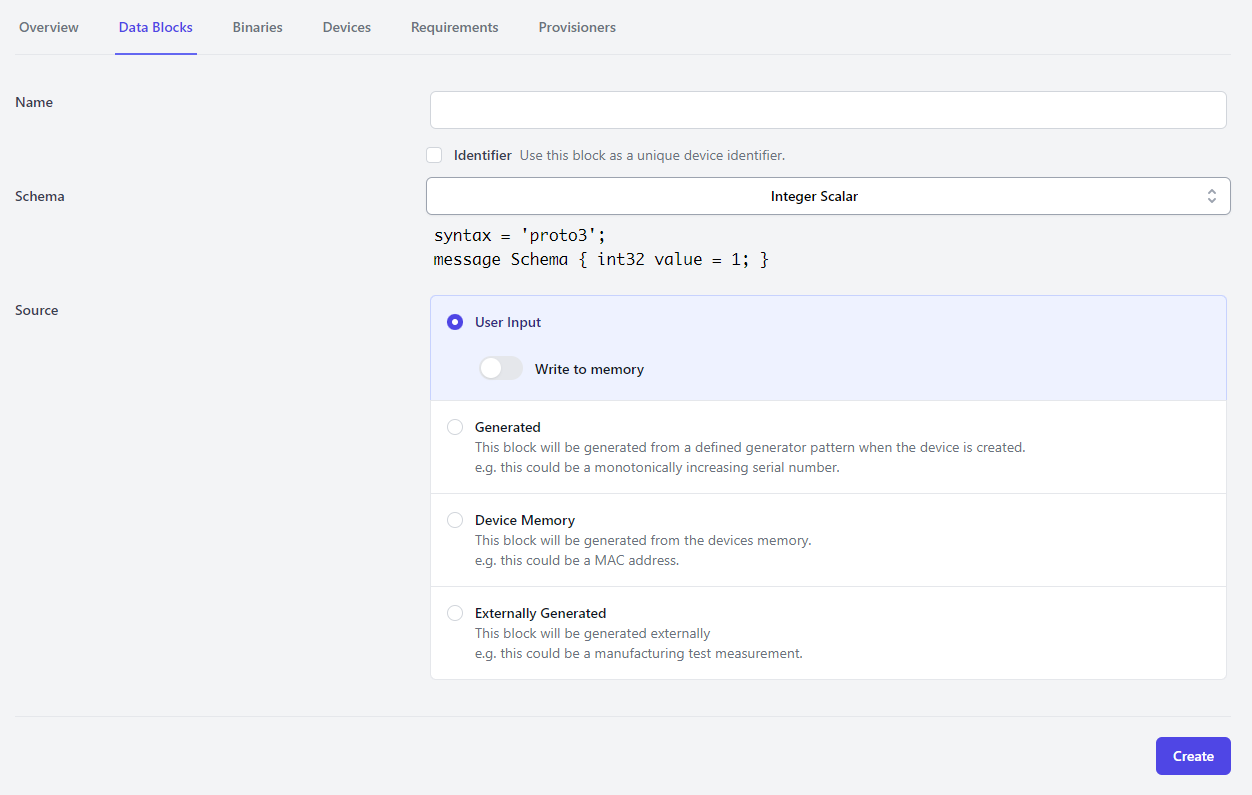
When you create a new data block, you will be prompted for four pieces of information, outlined below:
- What is the name of the data block being created
- Is the block a representation of the unique device identifier
- What is the schema of the data represented?
- What is the source of the data?
Identifier Blocks
One data block may be marked as the "Identifier". In this case, the value associated with the block will be used for display purposes in the "Devices" pane. Often, the "Identifier" should be the device serial number or other unique value to differentiate between devices.
The identifier can be selected for any data block, but only one data block may be marked as the identifier. If a new block is selected as the identifier, any previous identifier selection will be erased.
Block Schemas
The "Schema" associated with the block outlines the specific format of data within the block. The "Schema" is used for serialization and deserialization of the data contained within the block.
The following schemas are available:
| Name | Description | Example |
|---|---|---|
| Integer Scalar | A single integer value. | For example, this could be the number of outputs installed on a unit. |
| Float Scalar | A single real number. | For example, this could represent the measured device supply voltage during testing. |
| String Scalar | A single string. | This could be the human-readable serial number of the device. |
| Float Array | A sequence of real numbers. | This could be a series of voltage measurements taken on an output waveform from the device during testing. |
| Integer Array | A sequence of integer values. | This could be a configuration parameter for all of the output channels of a device. |
Block (De)Serialization
Serialization and deserialization are transformations on the data block to convert it between human-readable and binary representations. The serialization and deserialization process utilizes protobuf3 specifications.
When the block is written to device memory, the data block must be serialized. This process occurs immediately when the data block is uploaded to forged.dev.
Deserialization is completed when displaying data blocks on the "Devices" pane in the forged.dev UI.
Block Sources
Blocks may have a number of sources, which means where the data comes from.
The following sources are supported.
| Source | Description |
|---|---|
| User Input | The data is supplied by the operator at the start of the provisioning process. |
| Generated | The data is automatically generated when the provisioning process is started. |
| Device Memory | The data is collected by reading non-volatile memory from the device during the provisioning process. |
| Externally Generated | The data is provided by an external, automated source (such as a manufacturing test) at any point during the provisioning process. |
The source specification impacts how the forged.dev provisioning UI interacts with your project.
Specifically:
User Inputblocks will be requested from the operator at the very start of the provisioning process.Device Memoryblocks will be read from the device towards the start of the provisioning process and automatically uploaded to forged.devGeneratedblocks will be automatically generated for the product and will be accessible to future steps of the provisioning process (i.e. manufacturing test scripts, provisioning scripts)Externally Generatedblocks are assumed to be provided by an external test script
Persisting Data to the Device
Data blocks can optionally be written into device flash as part of the programming procedure. This enables powerful functionality, such as the ability to automate device-specific calibration parameters to achieve necessary accuracy and tolerance parameters for your product.
Uploading Block Data during Provisioning
The forged provisioner supports reading block data from the device during provisioning time using the RTT (Real-Time Transfer) protocol. This can be useful, for example, when performing self-test measurements on the device for manufacturing or extracting device-specific serial numbers or keys.
If RTT is configured on a device, the provisioner UI will monitor RTT output for 1 second to acquire blocks (the 1 second timer resets whenever a block is encountered).
Data is extracted from the device RTT output using a basic raw text transfer format, making it easily interoperable with printf-like functions over RTT.
The format of block uploads via RTT is as follows:
forged>{block-name}:{block-value}\n
Below is an example of uploading a device-specific MAC address for the mac-address data block:
forged>mac-address:41-56-21-3f-ff-fa\n
The string 41-56-21-3f-ff-fa is then associated with the mac-address datablock for this device.
Uploading blocks via RTT is supported for all scalar data types, including strings, integers, and floating point numbers.
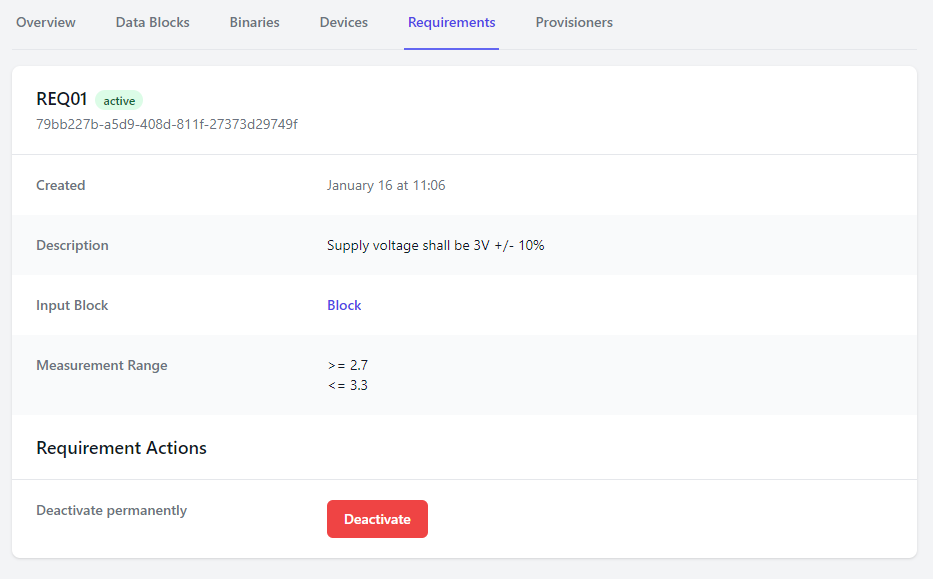
Requirements
Requirements outline specific checks that are completed against collected data blocks.
Requirements are used to determine if a device "passes" or "fails" the provisioning process.
When a device finishes the provisioning process, all of the currently active requirements are tested against the data collected for the device. A device will only "pass" at this stage if:
- All of the data blocks needed for requirement checks exist
- All the data block measurements conform with the required limits.
Limitations
Requirements are only supported for simple numerical data blocks (i.e. single numbers).
Currently, requirements only support number ranges, with optional upper and lower bounds. Bounds may be inclusive or exclusive.
If you have more complex use cases, please get in touch with the forged.dev team.
Creating Requirements
In order to create a new requirement, you must first specify the data block that the requirement is tested against.
Data blocks that can be used for requirements must use either the "Integer scalar" or "Float scalar" schema.
The "name" field should be a unique requirement specifier for the project. The "Description" field is used for informational display about the requirement.
Deactivating Requirements
When a requirement is no longer required for your design, it can be deactivated. Deactivation can only happen once, and requirements cannot be reactivated.
Deactivating requirements does not delete the requirement. This is intentional, as it ensures traceability for devices that may have used the now-deactivated requirement in the past, and it shows what those devices were tested against.
Provisioners
Provisioners enable a method for your test and provisioning system to communicate with forged.dev.
A provisioner is a computer that completes some physical operation, such as provisioning and testing a new device.
forged.dev supports any number of provisioners creating and processing many devices simultaneously.
Provisioner Overview
The provisioner is responsible for driving the provisioning process of a specific device. Provisioners communicate with the forged.dev servers throughout the provisioning process to record device-specific information, download firmware binaries, and record results and logs.
There are two primary options for controlling the provisioner:
- Utilize one of the released forged.dev API clients to customize the provisioning process
- Utilize the Provisioner UI to automate the provisioning process
Provisioner UI
The provisioner UI is downloadable via the Releases tab on the left of the forged.dev UI after you
log in. It will guide you through the installation and setup process.
The provisioner UI is a tool released by forged.dev to provide a user-friendly, automated interface with forged.dev. The UI:
- Automatically adapts to your project's data
- Automatically requests user input data at the start of the provisioning process
- Flashes firmware onto your device if there is a binary specified
- Performs a custom-specified test script after programming
- Indicates the final result of the provisioning process
The UI is intended to operate as a non-technical interface with forged.dev tooling.
The UI also allows an operator to re-run the provisioning process on a device to attempt to remedy an issue with the provisioning process. The results from all runs will be recorded separately.
API Clients
Forged publishes clients for interfacing with the forged.dev website that can be incorporated directly into your existing provisioning processes. The client allows you to:
- Download the latest firmware image
- Upload and download device data blocks
- Upload device logs
- Upload attachments associated with a device
Please reference the associated API client for further documentation on capabilities.
Regenerating Tokens
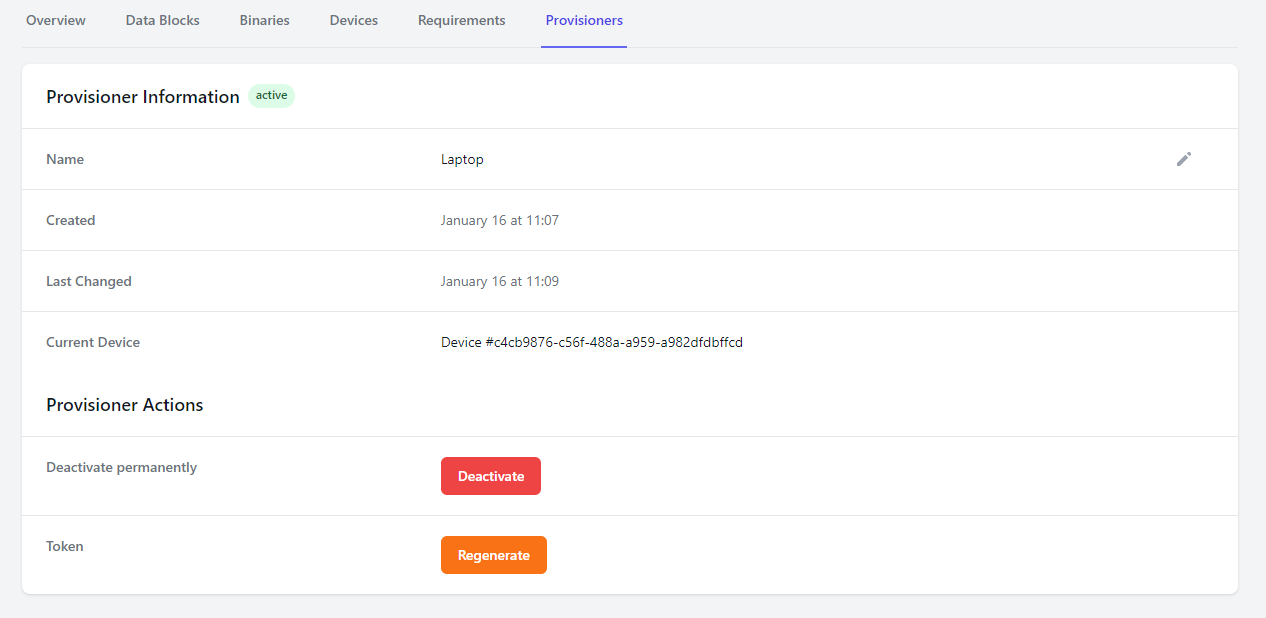
The provisioner communicates with the forged.dev service using a secret authentication token.
If a provisioner token is lost or compromised, it should be regenerated. This can be accomplished on the provisioner data screen, where the "Regenerate" button will regenerate a new token.
Deactivating Provisioners
When a provisioner is no longer needed, it can be deactivated. Deactivating a provisioner disables the token associated with the provisioner
There is no method to delete a provisioner. This is intentional to ensure that there is traceability from a device to the provisioner that originally created it.
Custom Chips
Forged supports custom chip specifications if you have a chip that is not supported out-of-the-box.
Description Generation
target-gen can be used to automatically generate
specification files for ingestion into forged.dev (and probe-rs) from ARM CMSIS packs quickly.
Implementaton Details
Custom chip descriptions are added to the probe-rs
implementation leveraged by the forged.dev backend and provisioner utilities. The description tells
the flashing utility about what memory sections are present and what algorithms should be used to
flash the device.
See the probe-rs documentation for more information.
Limitations
- Any custom chips uploaded are currently accessible to all users, not just your account.
Planned Features
The following features are planned for future releases of forged.dev:
- Visualization of pass/fail rates over time
- Visualization of process capability for your project to identify where your manufacturing process can be improved
- A turn-key manufacturing test solution that can be incorporated quickly onto new hardware to simplify the manufacturing test process.